Guide to Root XXCMD2 Android 4.1.2 Jelly Bean on Galaxy Note 10.1 N8000
You can update your Galaxy Note 10.1 N8000 to N8000XXCMD2 Android 4.1.2 Jelly Bean Official Firmware by going through our guide. And here is how you can root your Galaxy Note 10.1 N8000 running XXCMD2 Android 4.1.2 Jelly Bean Official firmware.
Disclaimer:
In order to root your Android device, we will require to flash a rooting
kernel to your tablet. We will be flashing a rooting kernel in your
Galaxy Note 10.1 N8000 running on XXCMD2 Android 4.2.1 Jelly Bean official firmware using ODIN. This will root your device. However, in this process you may lose your personal data and settings.
Please do also note that once your device is rooted, you warranty will be considered void by the OEM. You can, however, reclaim the warranty by re-applying official firmware update.
Download
- CF-Auto-Root-p4noterf-p4noterfxx-gtn8000 to root N8000XXCMD2 firmware [File: CF-Auto-Root-p4noterf-p4noterfxx-gtn8000.zip]
- Odin 3.07
Guide to Root XXCMD2 Android 4.1.2 Jelly Bean on Galaxy Note 10.1 N8000
- Download and extract CF-Auto-Root-p4noterf-p4noterfxx-gtn8000.zip. You will obtain a CF-Auto-Root-p4noterf-p4noterfxx-gtn8000.tar.md5 file in the unzipped folder.
- Extract Odin zip file and you will get Odin3 v3.07.exe.
- Switch your tablet off. And make sure that you wait 5-6 seconds to confirm complete the power down cycle.
- You will then put your Galaxy Note 10.1 N8000 tablet in Download
Mode by pressing and holding down the Volume Down button, alongside Home
and the Power button. A screen will then come up; warning you about
entering into Download Mode, press the Volume Down key to continue to
enter Download Mode.
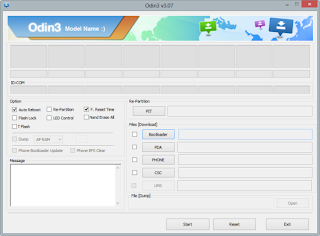
- Run Odin3 v3.07.exe with Administrator rights.
- Now that you are all prepared to root your tablet, connect your
Galaxy Note 10.1 N8000 with your PC. You will then see a notification
appear in Odin in the bottom left saying “Added!!”. If for some reason,
you do not see the said notification, try another USB port. If that too
doesn’t work, then reinstall the USB driver. Once you successfully see
the “Added!!” notification in Odin, you are good to go. Also, check for
COM port being depicted by a number in ‘yellow’ to make sure that you
have successfully added your device.
Select these files in Odin at their respective buttons:
- Click the PDA Button, and select the speedmod-kernel-s2-jb-k5-3-Odin.tar file.
- In Odin window, make sure Auto Reboot and F. Reset Time checkboxes are selected.
- Double check everything. Hit the START button to begin the flashing process.
- Once the flashing process is completed, the tablet will
automatically reboot and you will see a ‘Green’ PASS notification in the
top-left-most box. You can unplug the device from the computer now.
Your Galaxy Note 10.1 N8000 running N8000XXCMD2 Android 4.1.2 Jelly
Bean firmware is now rooted. If there are any issues, feel free to post
in the comments section for our staff to take a look at it.


0 komentari:
Speak up your mind
Tell us what you're thinking... !