

How to Customize Your Windows 8 Start Screen

 Windows 8 is dramatically different than its predecessors. The colorful,
tiled Modern interface was designed with Intel-powered Ultrabooks, and
mobile, touchscreen devices in mind. The real value of the Windows 8 Start screen, though, lies in customizing it to fit your needs.
Windows 8 is dramatically different than its predecessors. The colorful,
tiled Modern interface was designed with Intel-powered Ultrabooks, and
mobile, touchscreen devices in mind. The real value of the Windows 8 Start screen, though, lies in customizing it to fit your needs.
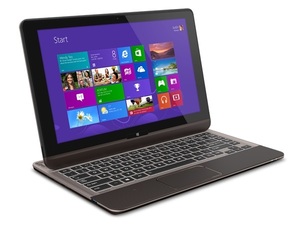
Intel-powered Ultrabooks are designed to make your notebook PC experience better than ever. They’re sleek and powerful at the same time, with a variety of connectivity and security features to make your mobile computing simpler and more secure. Hybrid devices with both a keyboard and a touchscreen, like the Toshiba U925 Ultrabook, offer both the capability of a traditional notebook PC and the mobility of a tablet.
To get the most out of your device, you’ll want to set the tiles on your Windows 8 Start screen so you can see important information at a glance and have easy access to the apps you use most.
You can configure just about any aspect of Windows 8, from the aesthetic elements like the color scheme and wallpaper, to the features that impact productivity like the positioning of apps, and enabling Live tiles for real-time updates on apps like Mail, Calendar, or Messaging.
Configure Colors and Images from the Charms Bar

For starters, let’s
look at how to configure the colors, background, lock-screen image, and
other elements that affect the look and feel of the Windows 8 Start
screen. On the Toshiba U925, you can swipe from the right side of the
touchscreen display, or swipe from the right side of the touchpad on the
keyboard to open up the Charms bar. You can also hover the mouse
pointer in the upper-right corner of the display.
Tap on the Settings icon at the bottom of the Charms bar, and then tap on the link that says “Change PC Settings.” The top option under PC Settings is “Personalize.” The right pane shows you the settings available to personalize.
If you tap “Lock Screen,” you can choose the image to display when Windows 8 is locked, and at the bottom you can specify which apps are allowed to continue running in the background and display alerts or updates on the Lock Screen while the PC is locked.
“Account Picture” lets you select a photo to use for your account. You can also take a new photo from the Account Picture settings using the built-in webcam on the Toshiba U925.
 Tap on “Start Screen” to choose a color scheme and background. There are
25 different color schemes, and 20 different background images
preloaded on Windows 8—so there are 500 different ways you can configure
the look of your Start screen. If you’re logged into Windows 8 using a
Microsoft account, the changes you make to these settings will be
automatically synced to any other Windows 8 PC you log into.
Tap on “Start Screen” to choose a color scheme and background. There are
25 different color schemes, and 20 different background images
preloaded on Windows 8—so there are 500 different ways you can configure
the look of your Start screen. If you’re logged into Windows 8 using a
Microsoft account, the changes you make to these settings will be
automatically synced to any other Windows 8 PC you log into.
Whether you download and install apps developed for Windows 8 from the Microsoft Store, or install legacy Windows software, the shortcut icons are added as new tiles to the Windows 8 Start screen. The difference is that Windows 8 apps run in the Windows 8 Modern interface, while the legacy software opens up in desktop mode. If you don’t arrange and manage the Start screen, Windows 8 can quickly become a chaotic mess of tiles.
Thankfully, it’s relatively easy to straighten things up. You can decide which apps should have tiles on the Start screen, drag the tiles to organize them how you wish, and change the size of the tiles. Some tiles also have a Live tile option, which dynamically refreshes the tile with recent updates or current news.
 To access your
options on the U925, right-click on a tile. If you’re using the
touchscreen, tap and hold the icon you want to work with, and drag it
down slightly. Either way, you’ll see a checkmark appear at the upper
right of the tile, and a bar will pop up at the bottom of the Start
screen.
To access your
options on the U925, right-click on a tile. If you’re using the
touchscreen, tap and hold the icon you want to work with, and drag it
down slightly. Either way, you’ll see a checkmark appear at the upper
right of the tile, and a bar will pop up at the bottom of the Start
screen.
For some apps, such as the default apps that come pre-installed with Windows 8—apps like Mail, People, Calendar, Music, and Bing—your options are limited. You can unpin the tile from the Start screen, uninstall the app entirely, change the size of the tile, or turn Live tiles on or off. Legacy apps that run on the desktop also have options like pin to taskbar, and run as administrator.
First things first, you should go through and simply unpin all of the apps you don’t want displayed on your Windows 8 Start screen. The apps will still be available, but the tiles won’t appear on the Start screen. You can right-click (or tap and drag) multiple tiles simultaneously, and then select “Unpin” from Start to remove them all in one fell swoop.
Next, move the tiles around to organize them. You might want to group your productivity apps together in one section, and the entertainment apps in another. Or, perhaps you want all of your social networking apps to be together. One recommendation is to put the tiles you use most—especially Live tiles like Calendar or Mail that display important information—on the far left where they’re most visible and accessible.
To move a tile, you can tap the touchscreen display and simply hold and drag the tile. Alternately, you can tap and drag the tile using the U925 touchpad.
Along with moving the tiles, you may also want to resize some of them. There are two choices for tile size—small and large. The small tiles are squares, while the large tiles are rectangles that are twice as wide—essentially two square tiles combined. You might want some tiles like Photos or News to be large so more information can be displayed. Other tiles, however—especially tiles that aren’t Live tiles—can be small tiles so you can fit more on the screen.
However you choose to configure the Windows 8 Start screen, it’s worth investing a few minutes to organize it and make it your own. You will enjoy your Windows 8 experience more, and operate more efficiently and effectively with your Ultrabook if you customize Windows 8 to make it your own.
Tap on the Settings icon at the bottom of the Charms bar, and then tap on the link that says “Change PC Settings.” The top option under PC Settings is “Personalize.” The right pane shows you the settings available to personalize.
If you tap “Lock Screen,” you can choose the image to display when Windows 8 is locked, and at the bottom you can specify which apps are allowed to continue running in the background and display alerts or updates on the Lock Screen while the PC is locked.
“Account Picture” lets you select a photo to use for your account. You can also take a new photo from the Account Picture settings using the built-in webcam on the Toshiba U925.
Create your own mosaic with Windows 8 Tiles
Traditionally, when you install software in Windows it adds a shortcut icon to the Start menu. Some software also places an icon on the Windows desktop. With Windows 8, that behavior is replaced with adding new tiles to the Start screen.Whether you download and install apps developed for Windows 8 from the Microsoft Store, or install legacy Windows software, the shortcut icons are added as new tiles to the Windows 8 Start screen. The difference is that Windows 8 apps run in the Windows 8 Modern interface, while the legacy software opens up in desktop mode. If you don’t arrange and manage the Start screen, Windows 8 can quickly become a chaotic mess of tiles.
Thankfully, it’s relatively easy to straighten things up. You can decide which apps should have tiles on the Start screen, drag the tiles to organize them how you wish, and change the size of the tiles. Some tiles also have a Live tile option, which dynamically refreshes the tile with recent updates or current news.
For some apps, such as the default apps that come pre-installed with Windows 8—apps like Mail, People, Calendar, Music, and Bing—your options are limited. You can unpin the tile from the Start screen, uninstall the app entirely, change the size of the tile, or turn Live tiles on or off. Legacy apps that run on the desktop also have options like pin to taskbar, and run as administrator.
First things first, you should go through and simply unpin all of the apps you don’t want displayed on your Windows 8 Start screen. The apps will still be available, but the tiles won’t appear on the Start screen. You can right-click (or tap and drag) multiple tiles simultaneously, and then select “Unpin” from Start to remove them all in one fell swoop.
Next, move the tiles around to organize them. You might want to group your productivity apps together in one section, and the entertainment apps in another. Or, perhaps you want all of your social networking apps to be together. One recommendation is to put the tiles you use most—especially Live tiles like Calendar or Mail that display important information—on the far left where they’re most visible and accessible.
To move a tile, you can tap the touchscreen display and simply hold and drag the tile. Alternately, you can tap and drag the tile using the U925 touchpad.
Along with moving the tiles, you may also want to resize some of them. There are two choices for tile size—small and large. The small tiles are squares, while the large tiles are rectangles that are twice as wide—essentially two square tiles combined. You might want some tiles like Photos or News to be large so more information can be displayed. Other tiles, however—especially tiles that aren’t Live tiles—can be small tiles so you can fit more on the screen.
Ultrabook Customization
However you choose to configure the Windows 8 Start screen, it’s worth investing a few minutes to organize it and make it your own. You will enjoy your Windows 8 experience more, and operate more efficiently and effectively with your Ultrabook if you customize Windows 8 to make it your own.


0 komentari:
Speak up your mind
Tell us what you're thinking... !